Layering watercolor is basically a way to mix watercolors on your paper by superposing layers instead of mixing them on your palette. As you can mix most colors with the 3 primaries ( yellow, blue and red). You can achieve convincing skin tones with yellow, blue and red. I find layering watercolors gives more control on the paint as you need to focus only on value and edges while painting. You can achieve great transparent and bright colors and convincing skin tones with a layering technique. It is a great way to paint skin tones with watercolor.
Here are a few things to remember when layering watercolors for skin tones:
You can add more convincing light effect by choosing a cool and a warm tone for each color. For example a warm yellow would be yellow Ochre, my main basis for skin colors, and a cold yellow would be lemon yellow. For blue I will often use Ultramarine as a warmer blue and Colbalt or Prussian as a colder tone. I will get a pinkinsh red (Alazarin Crimson) as a warm tone and a more orangy red (Permanent red light) as a cold red.
I am a Blick Art Materials affiliate and I receive a small compensation for sales. That does not effect in any way the cost of the purchaser’s order but it helps me keeping the content of this blog free.
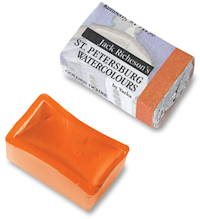
Same palette of traditional colors the great masters used a century ago. Liquid-poured means semi-moist pans respond instantly to a wet brush. 24 pans in plastic case. Also individual pans. – Master Set
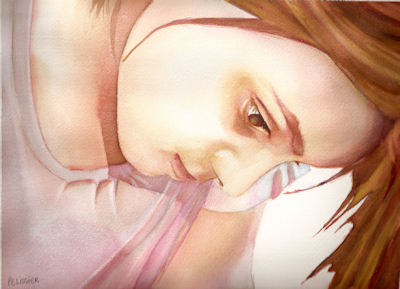
Sophie, in the kitchen- Watercolor on paper This portrait was made by layering colors
I always start by layering yellow . This is because yellow ocher for example and yellow in general will be more opaque than the blue and red colors.
It doesn’t matter if you paint the blue layer first or the red layer first. Personally I prefer painting blue last.
Always wait until your last layer is very dry before painting on top. Also try not to lift the paint by using a soft brush and not brushing the paper too hard.
You can always adjust colors after you have layered the yellow, blue and red by adding more colors ( brown, purple, etc…)
It is easy to lift off colors with a stiff brush and water.
You can use Paint shop pro or another image editing software as an help to show you where are the yellow, red, and blue located : see tutorial here
Originally from France, I have been living in North Vancouver, Canada for the past 20 years.
My work has been collected and exhibited extensively in Canada and internationally. I am also part of the Art Rentals and sales program of the Vancouver Art Gallery.
Many of my paintings have been published in Art books and magazines (Artist Magazine, Watercolor Artist Magazine, Acrylic Magazine, International Artist Magazine). I wrote 2 art instruction books with North Light/F+W Books.
I have been writing for the last 5 years for my blog: paintingdemos.com, that has a mailing list of about 10 000 subscribers and about 20 000 visitors per month.
I am an active member in the community, as a co-founder of the North Shore Art crawl, a co-founder of a weekly life drawing group, a board member of the North Vancouver Arts Council, and have been invited as a juror for public art, art grants and juried exhibitions. You can read more about my collaborations here.
Hi Sandrine,
Thank you for sharing your knowledge so generously. I would love to use your layering method to paint some portraits of my son but I really struggle with where the yellow, red and blue are. Do you still have a tutorial on how to use auditing software, I couldn’t get the link to work for me. Thank you x
Thank you so much – I hadn’t gone back far enough!
Your blogs & tutorials have been invaluable these past years and I love that you share your experience of the commercial aspect of being an artist too, have learnt lots.
So pleased when your book landed through my letterbox yesterday!
Very grateful x
Excellent! Thanks Malini. It makes me happy to know that what I am writing can be useful and might inspire other artists. Have a wonderful day 🙂
Luhan
thank you, this was very helpful… I guess it’s kind of like photoshop with all the layering..i think I understand now and I hope i pass my exams this way,
thanks again, for the easy explanation
god bless your kind soul <3
Thanks Luhan, yes it is exactly like working with layers in photoshop, same idea 🙂
Gary
Just want to thank you for sharing not only your work but the experience you share so unselfishly. There are so many that won’t share with those of us that want to improve, or even learn how to. What a shame when they pass on know one will be around to carry on their technique or style. I think of the masters, if they hadnt shared with their students who would have heard of them?
Thank you…this is very helpful. I have had a lot of trouble with skin tones lately with the watercolors…Went astray somewhere along the line and appreciate a fresh start.
Peace,
Siggi in Downeast Maine


Comments (9)
Malini Croxson
Hi Sandrine,
Thank you for sharing your knowledge so generously. I would love to use your layering method to paint some portraits of my son but I really struggle with where the yellow, red and blue are. Do you still have a tutorial on how to use auditing software, I couldn’t get the link to work for me. Thank you x
Sandrine Pelissier
Hi Malini,
Thanks 🙂
I did write a post that explained how you can use a software to see where the yellow, blue and red will go. It is here:https://paintingdemos.com/using-software-to-help-with-layering-colors-in-watercolors/
I am using Corel Paint Shop Pro in that tutorial.
Malini
Thank you so much – I hadn’t gone back far enough!
Your blogs & tutorials have been invaluable these past years and I love that you share your experience of the commercial aspect of being an artist too, have learnt lots.
So pleased when your book landed through my letterbox yesterday!
Very grateful x
Sandrine Pelissier
Excellent! Thanks Malini. It makes me happy to know that what I am writing can be useful and might inspire other artists. Have a wonderful day 🙂
Luhan
thank you, this was very helpful… I guess it’s kind of like photoshop with all the layering..i think I understand now and I hope i pass my exams this way,
thanks again, for the easy explanation
god bless your kind soul <3
Sandrine Pelissier
Thanks Luhan, yes it is exactly like working with layers in photoshop, same idea 🙂
Gary
Just want to thank you for sharing not only your work but the experience you share so unselfishly. There are so many that won’t share with those of us that want to improve, or even learn how to. What a shame when they pass on know one will be around to carry on their technique or style. I think of the masters, if they hadnt shared with their students who would have heard of them?
siggiofmaine
Thank you…this is very helpful. I have had a lot of trouble with skin tones lately with the watercolors…Went astray somewhere along the line and appreciate a fresh start.
Peace,
Siggi in Downeast Maine
Sandrine Pelissier
Thanks Siggi, I am very happy you liked it. Let me know how this works for you 🙂